HOME HISTORY MATERIALS TOOLS BUILD HOW TO PLAY
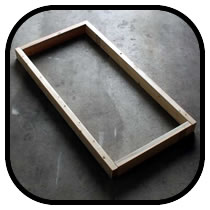
Construct your Bean Bag Toss table’s wood frame with the 2×4’s and screws. I recommend 2 ½ inch wood screws. We also used a couple of clamps to hold the frame together nice and flush. Countersink your screws if you don’t want them to show after you assemble.
However you do it, you’ll want all of your corners and edges to be flush with the other board. Keep in mind that even an apparently straight 2×4 can have a slight bend to it. You may need to torque your boards just a bit to get the last corner together properly. Don’t worry, a little distortion will work itself out. Drill your hole first with a drill bit slightly smaller in diameter than your screws. This makes it a little easier putting the screws in and ensures your wood doesn’t split as the screw goes in place. Also make sure to put the correct ends together. If you don’t, your frame will have the wrong dimensions!
Now put your plywood surface on the frame and screw it down (pre-drill the holes again). I used ten or twelve long screws. Your plywood should be a perfectly squared 2’ x 4’ piece of wood, but your frame might have a little distortion to it. You might need to tweak your frame just a little bit to fit the plywood’s shape. You can use your clamps again to make this part easier.
Now mark the center of the hole – 9″ from the top end of the board and 12″ from either side. Use a compass or something of the sort to draw a circle six inches in diameter. Cut the hole with a jigsaw after pre drilling a hole in the area to be cut out. I used a rotozip with circle cutting tool to easily cut the perfect circle
Next come the legs of your Bean Bag Toss board. This may be the trickiest part of the entire build. The leg has several requirements. It must raise the end of the Bean Bag Toss table 12 inches off the ground. It must also be sturdy enough to withstand an onslaught of Bean Bag Toss bags. Your Bean Bag Toss party will be a big flop if the legs break or fold in every time a bag hits it.
First we’re going to make a few markings on our legs. Estimate where our bolt will pass through the leg by drawing a line halfway from the side of your leg. (Remember, this midpoint will not be at the 2 inch mark since a 2×4 is not actually 2 inches by 4 inches – it will be more like 1 ¾”.) Make another line the same distance from the end of the leg and perpendicular to the first line. These two lines intersect at the point where you will want to pivot your compass. Use a compass to draw a half circle extending out to the edges of the board.
Next, turn your Bean Bag Toss table over so that the plywood surface is face down. Take one of your leg pieces and set it in place next to the top part of the frame with the markings facing out. Now, we’ll mark the hole for your bolt. Transfer your leg’s midpoint line onto the frame. Measure the midpoint of the frame’s 2×4 which again should be around 1 ¾”. Do not include the plywood in this measurement, just the 2×4 of the frame!
Where these two lines intersect is where we want the bolt to go, right through the center of the frame and leg. Make a little divot with an extra screw or nail at our mark to help guide the tip of the drill bit for this important step.
Drill a 3/8” hole through the side of your table and leg. You’ll notice I used clamps to hold things in place and I’ve got an extra board clamped in behind my leg. This extra board will give me a nice clean hole all the way through each piece of wood and reduces splintering. Do it this way if you’ve still got those clamps handy.
We typically go through a broad range of drill bits. We’ll start with a small bit for our pilot hole and gradually work our way up to 3/8”.
You’ll notice your leg isn’t going to do any folding away in the shape it is now. Using your mitre or hand saw, make several cuts to round out the end where you made the half circle with the compass. You may have to take off extra material so it flips down properly.
Now that your legs are properly trimmed, assemble your bolts, washers, and wing nuts. Sliding the carriage bolt through the hole in the frame (you might need to twist it through the hole) you’ll find the square shoulder of the bolt keeps things from becoming nice and flush. Take a hammer and gently tap the carriage bolt into the wood frame until it and the washer are flush with the wood surface. Put the bolt, washer, and nut in place but don’t tighten things down quite yet. Make sure your leg is freely moveable from the playing position to the folded position. The leg should move without difficulty. If not, determine what is obstructing the leg and trim some more.
Continue with the same steps for the other leg.
Finally, we need to get the end of your board 12 inches off the ground. Place your board upside down with the legs folded out. Measure from the top of the board at the back to the bottom of the legs and mark the leg at 12 inches. Now take a piece of plywood or a 4 foot level, something that is straight and long, and place one end on top of the frame at the front of the board and the other end at the mark on your leg. Now draw a line across the leg. This line will give you 12 inches of height and will allow the legs to rest flat on the ground. Remove the legs and cut with mitre saw and then reinstall.
To make the legs a sturdier we will attach a piece of plywood to the back. Measure between the 2 legs, including the thickness of each leg, then use that measurement to cut a piece of plywood 8 inches by whatever your measurement was. Fold out the legs and screw this piece to the back of the legs making sure it is level with the floor and everything is square. You now have legs that are very sturdy and can be folded up and down at the same time.
The boards are now assembled. Now onto our finishing touches.